There are several inexpensive, safe & effective ways to clean motorcycle tanks. I will detail a few of them, but after years of experience, I prefer to use Electrolysis followed by CLR type bathroom cleaner. This is a very inexpensive process, but it is NOT fast. Figure on four days for each phase. There’s no rushing it.
If your tank has only surface rust inside, not bubbled up or flaking material, you can probably get away with only Chemical treatment (Part 2), but I use Electrolysis (Part 1) on most tanks first, followed by Chemical treatment, just to be sure. Please also note the Warning about Sea Foam at the end.
Part 1 Electrolysis Requirements:
• 1 cup Arm & Hammer Washing Soda (NOT baking soda) available at super markets
• 5 gallon container of fresh water
• 1 bare metal coat hanger
• 1 or 2 plastic lids from a disposable 1 gallon oil jug or any other plastic lid that will fit snugly upside down in the gas tank filler hole (for CB900C/1000C). For older SOHC tanks I use the cap from a paint spray can, which sits over the filler neck.
• side cutters
• battery charger, minimum 6 amp @ 12 volt with short-out protection (most have this)
• access to a garden hose and lots of fresh water
• gasoline and a container to use to capture contaminated gas
• small telescopic shop magnet
• a scrap of medium Emery cloth or sandpaper
• paper towels
Part 1 The Process
- Mix one cup of Arm and Hammer Washing Soda (NOT baking soda) to 5 gallons of fresh water to make an electrolyte solution – don’t be exacting with proportions! This process works best with the liquid at room temperature or a bit higher throughout the process.
- Dump any fuel out of the gas tank, remove the petcock and plug the petcock hole.
- Fill the tank with solution.
- Use the lid from a plastic gallon oil jug – poke two holes about 1/2” apart in the lid, large enough that a piece of metal coat hanger can go through each hole.
- Make a narrow loop of bare metal coat hanger about 6” long, passing the ends through the top side of the plastic lid and bend the ends over to stop the hanger ends from pulling out of the lid. For CB900C/1000C, using the lid upside down forms a rim so the battery lead (step 9) won’t touch the metal filler neck. For SOHCs, I use a paint spray cap right side up, so it sleeves over the filler neck. Notch it for the tank cap hinge.
- Slightly bend the loop in a curve so you can slide it into the tank filler hole so the plastic cap sits roughly but securely in the filler hole and the metal loop DOES NOT touch metal inside the tank. This takes a little fooling around but it’s not rocket science.
- Get a battery charger set to 6 or more amps 12 volts.
- If you used a metal cap on the petcock, attach a battery charger’s negative lead to the metal, otherwise back out one emblem screw enough that you can attach the negative lead there.
- Turn on the charger. Brush the positive lead on one of the coat hanger ends in the plastic cap. If the charger meter spikes or the lead sparks, the electrode is contacting metal. Adjust the electrode so it doesn’t do this. Once in a while the electrode shifts and grounds out when unattended, but the charger’s protection should cut in.
- From now on for the next three days (or more), every four hours or so during the day, remove the positive lead, pull the electrode carefully (it will be covered in crud), clean it with a wire brush whenever you can. Never leave it more than 12 hours. It will get eaten away, so it’s best to replace it at the last cleaning of the day. If the electrode should break up, make a new one and carry on. We’ll fish the debris out later.
- Remove the petcock plug, flush the tank with fresh water (work the hose around inside), alternately allowing drainage through the petcock hole and inverting the tank until the water runs clean,
- Block the petcock opening again, pour in one container of “CLR” drain cleaner. It is supposed to be ‘green’, non-toxic and safe even for plastic plumbing (so you don’t have to fear the stuff eating a hole in your tank), then top off the tank with water and leave it
- sit at least four days (longer is better),
- Flush the tank thoroughly with fresh water as before – the inside should now be shiny but there may be sludge almost like oily graphite which will come out soon,
- Use a small telescopic magnet to probe the front bottom of the tank on each side while tipping the tank forward, to grab as much rust debris as reasonably possible,
- NOTE If you want to use Chemical Treatment, at this point with the tank still wet inside,
- Use some Emery cloth to clean the inside faces of the filler neck area where the electrolyte was not able to reach and brighten the seal area for the gas cap.
- Flush once more with water and shake it upside down to get as much water out as possible,
- Install the petcock, add about a quart or a litre of gasoline, slosh it around and dump it out again to help remove the last of the water and any sludge, then shake as much out as possible,
- Wash & dry the tank outside including the under side. If there’s any bare metal underneath from abrasion, paint those areas. Give the whole thing a good coat of wax.
- Put the tank on the bike, attach the fuel line with new fuel filter, add fuel, purge air from the fuel line & filter, then connect to the carbs. And you should be done!
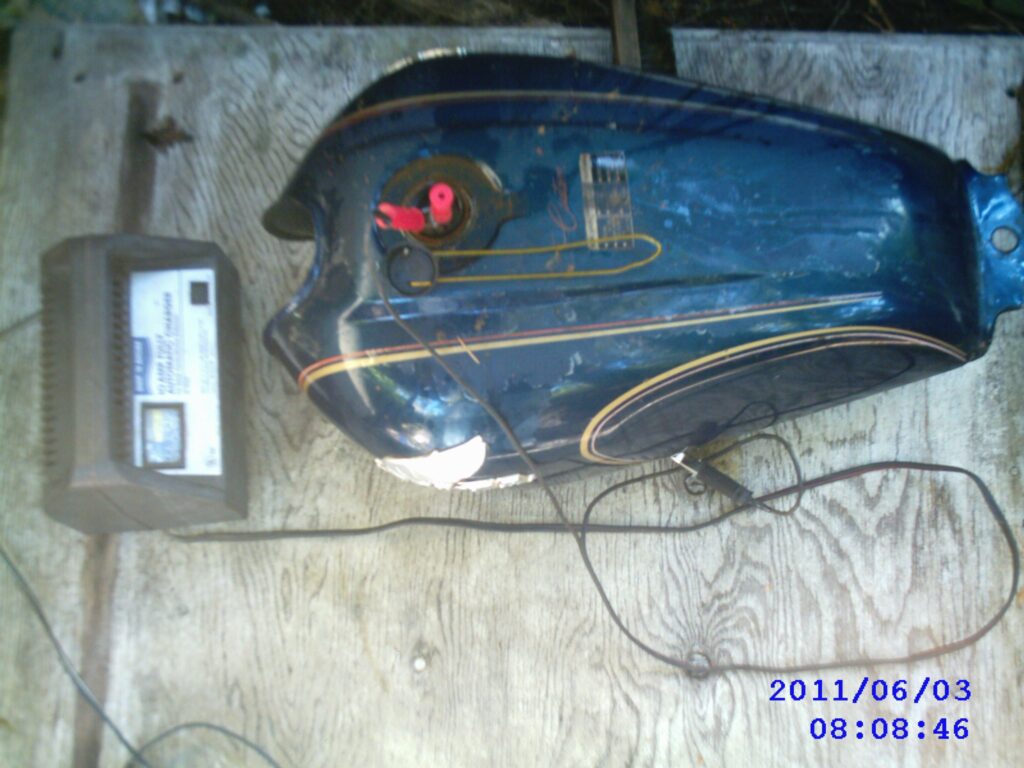
In the picture of the blue tank you can see a tank connected to the charger. In this case, like a lot of CB900C tanks, the petcock connects to what looks like a pipe nipple and a 3/8” pipe cap threads on and seals well, so the negative terminal of the charge clips on there.
Other times, use a short length of flexible pipe to fit on the nipple, a plug in the free end and hose clamps on both ends. However you go about it, you need to seal up the petcock connection. If you don’t have a metal part sealing the petcock connection, back a screw out of the tank emblem a few turns and connect your negative lead there.
Also note in the picture, on top of the tank by the filler is a sample of the electrode used inside the tank and connected to the positive charger lead. The plastic cap used upside down fits well in the tank filler hole.
The actual labor time is just a few hours. The total cost is less than $10. The finished product is far superior to anything I’ve gotten with electrolysis & tumbling with abrasive inside
Part 2 Chemical Treatment Required:
- Container of CLR or equivalent generic (make sure it’s water soluable)
Part 2 Chemical Treatment Process:
- Dump out any old gas and dispose of it responsibly. I prefer to remove the petcock and plug
- it’s opening. If nothing else, this helps with trying to get the tank really empty later.
- Position the tank so the filler is the highest point, so no air gets entrapped inside.
- Pour in the entire container of CLR and top up the tank with water so it comes right up on the
- lip of the tank filler neck. Keep a small container of water handy to keep the level right up.
- This will ensure that the filler neck gets cleaned as well as the tank.
- Leave the tank for several days, ocassionally checking and topping up the tank if needed.
- Follow from Part 1step 17 to completion of the process for Electrolysis
Your tank should look like burnished gray/shiny steel. There will be some discoloration in places but with a good oily coating, it will not flash rust. If you put it into service, even only partially filled with gas, it should not deteriorate again.
Warning:
Incidentally, a while ago one particular tank I dumped some SeaFoam into the tank when it was 1/4 full at most, so the SeaFoam washed down the inside of the tunnel. That metal, directly below the filler hole, rusted very badly shortly after. This makes sense because you can use SeaFoam for cleaning heads and so on. From that experience, I won’t put SeaFoam in a tank unless there’s enough gas to cover the tunnel, or I’ll mix gas and SeaFoam.
RETURN TO PREVIOUS SITE LEVELS: